Showing posts with label Crafts. Show all posts

Sunday, August 23, 2020

3 Easy DIY Dog Enrichment Activities

Hello everyone!
National Dog Day is this week (the 26th) and ya know what a dog lover I am.
After having two pups of my own to love and spoil I have learned how important it is to not only stimulate your dog physically but mentally. 
Today I am going to share 3 of my favorite dog enrichment activities.
They are easy to throw together with things you most likely have on hand and, will give you some time to get things done while your pup is distracted.

Egg Carton


You will need:
An Empty Egg Carton
Newspaper
Treats


Open the egg carton.
Cut newspaper into short strips about 1 inch wide.


Roll treats into a few strips of newspaper and place into the empty indentations of the egg carton.
Roll the remaining empty stirps of newspaper into balls and place them into the other empty spaces.


Close the lid to the egg carton.
Give to your pup and let them go wild!


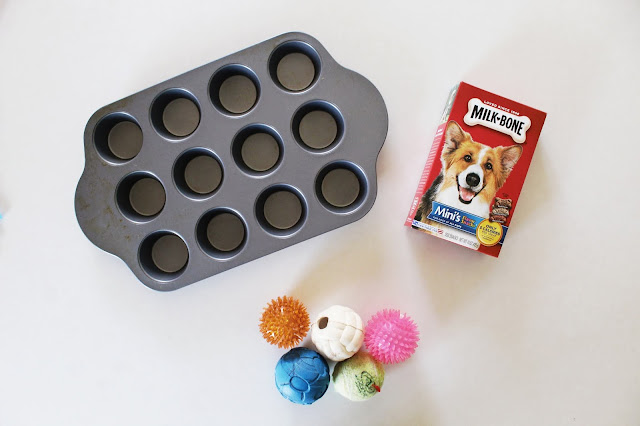
Muffin Tin


You Will Need:
Muffin Tin
Balls
Treats 


Place treats into a few holes of the muffin tin.


Cover each hole with a ball.
Give it to your pup and let them have at it!


Hole Ball


You will need:
Hol-ee Roller Ball 
Scrap Fabric
Treats


Cut the fabric into short strips about 1 inch wide.


Wrap treats in a few pieces of fabric.


Roll the remaining pieces of fabric into balls.
Take turns placing the treat-filled and empty pieces of fabric through the holes in the ball until full.
Give it to your pup and let them play!


All of these activities have been loved by me and my pups.
They love that they are getting a treat and I love that they are exercising their mind and letting me get some work done guilt-free.
A quick tip.
When starting these activities, use more treats to help pique their interest and to show them how they work.
Then slowly added fewer treats over time. 
We don't want to give them too many treats so they can stay fit and healthy.
Do you have a dog?
If so, what breed and what is its name?
I have to know their name!


All my love, 
Autumn

Sunday, June 14, 2020

DIY Metallic Mountain Wood Cut Out

Hello everyone!
Summer is finally here and for us, that means cabin season.
Erik and I were both lucky enough to grow up with grandparents who own cabins.
Both of our family cabins are still around and in the summer we try to get up to them as much as possible.
I have been slowly adding a few of my own touches to my family cabin over the years.
I found a wood mountain cut out at Michael's and decided to dress it up for my next piece of cabin decor.


You will need:
A Wood Cut Out, Any Shape Works!
Paint
Paintbrush
Mod Podge
Metal Leaf


Paint the wood your desired color.
I couldn't decide between a navy mountain or an olive mountain so, I went with both!
I painted one side navy and the other side olive.
That way I can use it with different decor over the years.


Let the paint dry.
Apply additional coats if needed, I did three.
Once the paint is completely dry, start to apply your metal leaf.
I used silver leaf for the navy mountain and gold leaf for the olive mountain.
The instructions my metal leaf came with said to use a special adhesive specifically for metal leaf but I didn't want to spend more money so, I went with Mod Podge since I had it on hand. 
Apply a thin layer of Mod Podge to the area you want your metal leaf.
I found it was best to work in small sections.
Immediately apply the metal leaf onto the Mod Podge and using the backing paper gently rub onto the wood.


Once the metal leaf is secure carefully remove the backing paper.
Repeat until you have the metal leaf in all of your desired places.
I kept mine on the peaks of the mountain.


Use a soft brush to remove excess metal leaf.
Apply another thin layer of Mod Podge on top of the metal leaf to secure into place.
Let dry.
Enjoy!


I am very excited to take this up to my family's cabin this year.
The metallic accents will add a little glamour to our rustic cabin.
Which is just the way I like it. 😉
What color do you prefer?
Navy? 


Or olive?


All my love, 
Autumn

Sunday, April 12, 2020

Quick and Easy DIY Floral Initial

Hello everyone!
Springtime is upon us even though we are stuck in the house...
Today I am going to show you an easy DIY for a floral initial.
It's the perfect decoration to bring a little springtime to your home.


You will need:
Wood Initial
Flower Blooms
Wire Cutters
Hot Glue Gun
Hot Glue Sticks


Using the wire cutters, cut the flowers and leaves from the stems, getting as close to the base as possible to help them lay flat.
Starting with the large flowers, arrange on the initial in your desired position.
Add in the medium flowers.
Then the small flowers.
Then add in the leaves to fill in any open spaces.
Once the letter looks how you'd like, hot glue the flowers and leaves into place.
Let dry.
Enjoy!


This craft is super quick and simple.
It took me around ten minutes to create.
It would look so cute sitting on a shelf, or you can add it to other items around the house to give them some spring flair.
We added ours to our boxwood wreath on our front door.
It would also make the perfect gift for Mother's Day.
It's coming up!
Hint, hint.
How would you style a floral initial?


All my love,
Autumn 

Sunday, April 5, 2020

DIY Bunny Face Pots

Hello everyone!
Easter is one week away!
This will be a very different Easter for most of us.
No gathering with family, no seeing friends, no community egg hunts.
That doesn't mean we can't spread a little joy!
I had originally planned on giving out these bunny pots as Easter gifts to my family on Easter Sunday but, now that I will not be seeing them I thought it would be fun to do a good old fashioned doorbell ditch.


You will need:
Terracotta Pots
Paint, I Used Lavendar, White, Mint, and Black
Large Paintbrush
Fine Tipped Paintbrush
Crinkle Grass
Fillers


With the large paintbrush, paint the Terracotta pots your desired colors.
I went with spring pastels.
I wanted my pots to have a bit of a weathered look so, I used a large paintbrush and painted uneven coats on each of my pots.
I thought it made them feel a little more rustic.


You can use a smaller paintbrush and make them nice and even if you prefer.
Once the paint is dry, use the black paint and fine-tipped paintbrush to paint the bunny faces on the front of the pots.
Two eyes, a nose and a few whiskers in different styles.
A regular bunny face.


A winky bunny face.


And the ever-popular closed eyes bunny face.


Once the faces are dry, fill the pots with crinkle grass and a few goodies and they are ready for delivery.
Enjoy!


These cute little pots come together in no time and would be the perfect way to brighten up someone's day this holiday week. 
What are your plans for this nonconventional Easter?


All my love,
Autumn

Sunday, March 15, 2020

DIY Rainbow Balloon Art

Hello everyone!
I think we could all use a little more rainbows in our life with all of the craziness going on in the world.
And with St. Patrick's Day just a few days away I am here to make that happen with this fun DIY rainbow balloon art!
We currently have this set up in our house making it very festive.
Plus, it makes us both happy!


You will need:
Balloon Pump, Optional
Tape


Decide on the design of your rainbow.
I wanted a full rainbow with white balloon clouds on either end.
You could do a full rainbow like me, or do half a rainbow.
It's up to you!
Blow up your twisty balloons.
I decided three balloons in each color would work for me.
I'd highly recommend a balloon pump when working with this many balloons. 
The twisty balloons don't have a lip like normal balloons so, I just taped the ends to keep them from deflating. 
Once you have your balloons inflated, organize them into your desired shape.
I started from the color red down.
Place pieces of rolled tape onto the back of the balloons and stick them on the wall.
Once the balloons are organized into your rainbow, blow up your white balloons and tie closed.
Tape the white balloons to the end of your rainbow to imitate clouds.
I used 6 balloons at each end.
Enjoy!


I will be honest, this took more work than I originally thought...
 But it was worth it!
It's such a fun statement piece for any celebration.
And now I am a balloon wizard for future balloon crafts!
Have you ever made a balloon statement piece?


All my love,
Autumn

Sunday, January 26, 2020

DIY Cupid's Arrow Gift Boxes

Hello everyone!
Valentine's is slowly creeping into our lives and I love it...
No pun intended!
I have always enjoyed Valentine's Day and the opportunity it brings to shower the people in my life with love.
Today I am going to show you how to make simple Cupid's arrow gift boxes to help you give some love.


You will need:
Scissors
Wood Dowels, I used 3/8 Inch
Hot Glue Gun
Glue Sticks
Fillers


Remove the lids from the heartshaped boxes.
I used pre-colored boxes but, you can get plain papier mache boxes and decorate them individually if your people aren't fans of classic Valentine's colors. 
With the scissors, poke a small hole towards the bottom of each of the boxes.
You will want the hole towards the bottom so the lid will be able to still fit comfortably on the box.
Start small, you can always go bigger but not smaller. 
Work the wooden dowels through the holes until they are just barely through.


Secure the dowels into place with the hot glue.
On the opposite end of the dowels, hot glue feathers on top of one another until you reach your desired fullness.
Add your fillers into the boxes.
I used three-inch boxes for my arrows but, you can use larger if needed.
The three-inch boxes are perfect for holding candy, jewelry, and small toys.
Gift.
Enjoy!


These boxes take no time to create and turn out so fun.
The feathers, the colors, a functional heart-shaped box.
What's not to love?
They are perfect to give smaller gifts in, to decorate a larger gift with or even as just a decoration in your home.
How would you use these fun boxes in your life?


All my love,
Autumn

Sunday, December 29, 2019

DIY Disco Ball Piñata

Hello everyone!
Are y'all ready for a new decade?!
Because it's basically here...
To help us celebrate I made this fun DIY disco ball piñata.
I have made a few piñatas in my day.
They aren't hard but, are a little time-consuming.
Make sure to give yourself a few days to complete this project.


You will need:
Newspaper
Scissors
Flour
Water
Fringer Scissors, Optional
Tape
Silver Ribbon


Start by inflating the balloon to your desired size.
I inflated mine about halfway, 18 inches.
A 36-inch balloon is rather large...
I'm lazy and didn't want to decorate the whole thing but still wanted it to be large enough to make an impact.
You can blow it up to the full size if you prefer.
Cut your newspaper into 1-inch strips.
Cut A LOT because you will need it.
Once your strips are ready to use, create your papier-mache.
Mix 1 part flour to 1 part water until a paste is made, it should be a thick glue-like substance. 
1 and 1/3 cups of each is the amount that worked for me.
You will need to make more or less depending on the size of your balloon.
Dip the strips of newspaper in the paste and slide off any excess with your fingers.
Add the wet strips directly onto the balloon.
To help keep the balloon in place, set it in a box.
Repeat until the balloon is completely covered.
Let dry completely.
I recommend 24 hours but, have gotten away with 12 when I was in a hurry.
Once the first layer is completely dry, apply another layer in the same manner.
Let dry.
Add a third coat to make it extra sturdy.
Let dry.
Once the final layer is completely dry, poke a hole through the papier-mache to deflate the balloon. 
Cut a small flap in the top of the papier-mache, large enough to fit your hand into so you can stuff it with your goodies.
Open the flap and remove the deflated balloon.
Cut long strips of crepe paper.
With the fringe-scissors, fringe one side of the crepe paper leaving about an inch of space at the top to attach to the piñata.
You can fringe the crepe paper with regular scissors as well but, the fringe scissors will save you quite a bit of time.
I'd highly recommend investing in some! 
Starting at the bottom of the piñata, add a layer of the fringed crepe paper.
Use small pieces of tape every few inches to secure into place. 
Continue adding strips of the crepe paper up the piñata until it is entirely covered.


Poke two slits in the top of the piñata and string one end of the silver ribbon through.
Tie the ribbon into a knot on the inside of the piñata.
Repeat with the other ribbon end to create a loop in which to hang the piñata from. 
Open the flap and fill with your goodies.
 Seal the flap with tape.
Hang and enjoy!


I love how this piñata turned out!
The size and metallic silver make it the perfect pop of fun every party needs.
I am planning on using it as decor for our New Years' Eve at home.
It's too pretty (and took too long) to wreck!
Maybe next year?
How are you spending your New Year's Eve?


All my love,
Autumn