Showing posts with label DIY. Show all posts

Sunday, August 23, 2020

3 Easy DIY Dog Enrichment Activities

Hello everyone!
National Dog Day is this week (the 26th) and ya know what a dog lover I am.
After having two pups of my own to love and spoil I have learned how important it is to not only stimulate your dog physically but mentally. 
Today I am going to share 3 of my favorite dog enrichment activities.
They are easy to throw together with things you most likely have on hand and, will give you some time to get things done while your pup is distracted.

Egg Carton


You will need:
An Empty Egg Carton
Newspaper
Treats


Open the egg carton.
Cut newspaper into short strips about 1 inch wide.


Roll treats into a few strips of newspaper and place into the empty indentations of the egg carton.
Roll the remaining empty stirps of newspaper into balls and place them into the other empty spaces.


Close the lid to the egg carton.
Give to your pup and let them go wild!


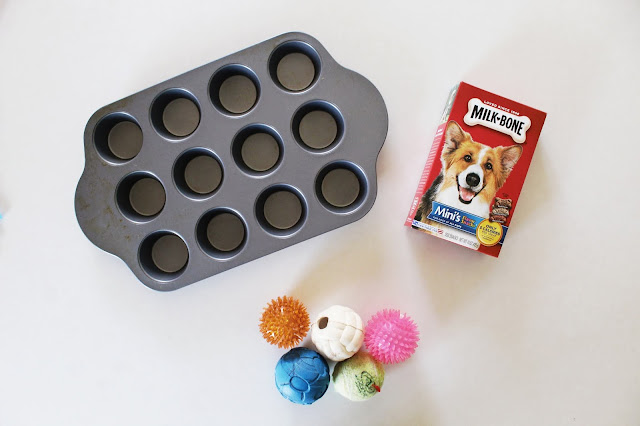
Muffin Tin


You Will Need:
Muffin Tin
Balls
Treats 


Place treats into a few holes of the muffin tin.


Cover each hole with a ball.
Give it to your pup and let them have at it!


Hole Ball


You will need:
Hol-ee Roller Ball 
Scrap Fabric
Treats


Cut the fabric into short strips about 1 inch wide.


Wrap treats in a few pieces of fabric.


Roll the remaining pieces of fabric into balls.
Take turns placing the treat-filled and empty pieces of fabric through the holes in the ball until full.
Give it to your pup and let them play!


All of these activities have been loved by me and my pups.
They love that they are getting a treat and I love that they are exercising their mind and letting me get some work done guilt-free.
A quick tip.
When starting these activities, use more treats to help pique their interest and to show them how they work.
Then slowly added fewer treats over time. 
We don't want to give them too many treats so they can stay fit and healthy.
Do you have a dog?
If so, what breed and what is its name?
I have to know their name!


All my love, 
Autumn

Sunday, July 19, 2020

Updated Spice Jars

Hello everyone!
You may remember a few years ago I did a post showing you how I labeled my spice jars.
Truth be told they weren't exactly what I wanted...
I had always planned on labeling them in white but, Erik and I realized that household printers don't print white...
Needless to say, I settled with the black labels and I didn't mind them.
A few years have passed and the labels aren't holding up well.


In all honesty, I think it was simply user error. 
So, I decided this was the perfect opportunity to go back to what I originally wanted.
White cursrive labels.
Only this time they will be handwritten.


Remove the old labels.
Clean the outside of the spice jars and remove any leftover sticker residue.
Dry thoroughly.
Using the paint marker label the jar with the name of the coordinating spice in your desired handwriting.
I went with cursive but print would work great too!
Let the ink dry.
Put away.
Enjoy!


The jars weren't the only thing I upgraded.
I moved the spices from their tiny cupboard,


 to a three-tiered shelf in our pantry.


Overall I am much happier with the results!
Bye worn-out labels!


I love the look of these spice jars much more than my originals.
The white is easier to read and gives a brighter, cleaner look.


Which do you prefer?
The black or white labels?


All my love,
Autumn

Sunday, June 14, 2020

DIY Metallic Mountain Wood Cut Out

Hello everyone!
Summer is finally here and for us, that means cabin season.
Erik and I were both lucky enough to grow up with grandparents who own cabins.
Both of our family cabins are still around and in the summer we try to get up to them as much as possible.
I have been slowly adding a few of my own touches to my family cabin over the years.
I found a wood mountain cut out at Michael's and decided to dress it up for my next piece of cabin decor.


You will need:
A Wood Cut Out, Any Shape Works!
Paint
Paintbrush
Mod Podge
Metal Leaf


Paint the wood your desired color.
I couldn't decide between a navy mountain or an olive mountain so, I went with both!
I painted one side navy and the other side olive.
That way I can use it with different decor over the years.


Let the paint dry.
Apply additional coats if needed, I did three.
Once the paint is completely dry, start to apply your metal leaf.
I used silver leaf for the navy mountain and gold leaf for the olive mountain.
The instructions my metal leaf came with said to use a special adhesive specifically for metal leaf but I didn't want to spend more money so, I went with Mod Podge since I had it on hand. 
Apply a thin layer of Mod Podge to the area you want your metal leaf.
I found it was best to work in small sections.
Immediately apply the metal leaf onto the Mod Podge and using the backing paper gently rub onto the wood.


Once the metal leaf is secure carefully remove the backing paper.
Repeat until you have the metal leaf in all of your desired places.
I kept mine on the peaks of the mountain.


Use a soft brush to remove excess metal leaf.
Apply another thin layer of Mod Podge on top of the metal leaf to secure into place.
Let dry.
Enjoy!


I am very excited to take this up to my family's cabin this year.
The metallic accents will add a little glamour to our rustic cabin.
Which is just the way I like it. ðŸ˜‰
What color do you prefer?
Navy? 


Or olive?


All my love, 
Autumn

Sunday, April 26, 2020

3 Easy Ways To Decorate Macarons

Hello everyone!
Mother's Day is fast approaching.
I always like to give my mama a treat along with some fresh flowers. 
This year I decided to go with macarons.
They are beautiful and elegant which makes them perfect for Mother's Day.
I have never made my own macarons and I wasn't going to start with ones meant to be a gift so, I purchased some from a local bakery.
I wanted to add my own touches to them so they would feel a little more personal.
Here are the three ways I added my own decor.


Paintbrush Strokes


Add a few drops of almond extract (or another clear extract) to food coloring and mix to dilute.
Using a small food-safe paintbrush, add strokes to your macarons.
I did one with thicker strokes for a modern look.


And I did another with lighter strokes that really showcased the brushwork and gave it a more sophisticated feel.


Gold Leaf


Using baking tweezers (NOT your hands as the oil from them will dissolve the gold leaf) take small pieces of edible gold leaf and place them on the macaron.
I kept my pieces small and to one side.


Shapes and Initials


Add a few drops of almond (or another clear extract) to food coloring and mix to dilute.
Using a small food-safe paintbrush, gently paint your desired shape onto the top of the macaron.
I went with a heart.


Add a few drops of almond (or another clear extract) to food coloring and mix to dilute.
Using a small food-safe paintbrush, gently paint your desired initial onto the top of the macaron.
I went with an "M" for mom.


I also used the heart macaron as an "O" to spell out mom.


Package the macarons for gifting.
Enjoy!


Here's a little before and after.


I love how these simple designs added character and made the macarons feel a little more homemade and thoughtful.
What are you getting the ladies in your life for Mother's Day?


All my love,
Autumn

Sunday, April 12, 2020

Quick and Easy DIY Floral Initial

Hello everyone!
Springtime is upon us even though we are stuck in the house...
Today I am going to show you an easy DIY for a floral initial.
It's the perfect decoration to bring a little springtime to your home.


You will need:
Wood Initial
Flower Blooms
Wire Cutters
Hot Glue Gun
Hot Glue Sticks


Using the wire cutters, cut the flowers and leaves from the stems, getting as close to the base as possible to help them lay flat.
Starting with the large flowers, arrange on the initial in your desired position.
Add in the medium flowers.
Then the small flowers.
Then add in the leaves to fill in any open spaces.
Once the letter looks how you'd like, hot glue the flowers and leaves into place.
Let dry.
Enjoy!


This craft is super quick and simple.
It took me around ten minutes to create.
It would look so cute sitting on a shelf, or you can add it to other items around the house to give them some spring flair.
We added ours to our boxwood wreath on our front door.
It would also make the perfect gift for Mother's Day.
It's coming up!
Hint, hint.
How would you style a floral initial?


All my love,
Autumn