Showing posts with label Design. Show all posts

Sunday, December 2, 2018

DIY Christmas Movie Quote Gift Tags

Hello everyone!
Happy December!
Christmas is on its way!
Every year I have the best intentions to add cute gift tags to my Christmas gifts but never get around to it. 
I end up having to remember who's gift is who's by the shape.
That will not be the case this year as I finally have gift tags.
I made my own!
One of my favorite parts of the holidays is snuggling up and watching Christmas movies.
Certain movies tend to remind me of certain people.
I thought it would be fun to gift someone their present with a personalized gift tag featuring a Christmas movie quote inspired by them.


You will need:
Cardstock
Printer
Ink
Hole Punch
Ribbon
Scissors
Items to decorate with, Optional
Gifts

To start, think of some quotes that would be perfect for the people on your gift list.

I went with:
Son of a nutcracker! - Elf
And a fandpa for your Cousin Leon. - How the Grinch Stole Christmas
I want to wash my hands, my face, my hair with snow. - White Christmas
And none for Gretchen Wieners. - Mean Girls
Is your house on fire, Clark? - National Lampoon's Christmas Vacation
Every time a bell rings, an angel get his wings. - It's a Wonderful Life
Solve world hunger. Tell no one. - How the Grinch Stole Christmas
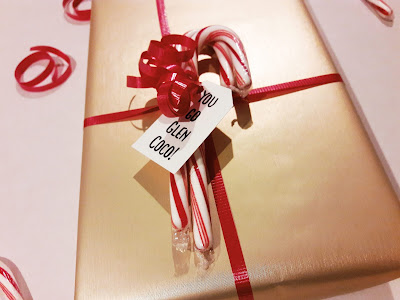
You go Glen Coco! - Mean Girls
Merry Christmas, ya filthy animal. - Home Alone
Fra-gee-lay. It mush be Italian! - A Christmas Story

Type the quotes up on your computer.
Print out the quotes.
Using your tag punch or scissors cut the quotes out into a tag.
Punch a hole into the tag to create a place for your ribbon to fit through.
Slip your ribbon through the hole.
Tie the tag to your gift.
I kept my quotes very simple as I wanted to add more to them when they were on the gift.


For instance my dad's favorite Christmas movie is It's A Wonderful Life.
Even if you haven't seen this movie you are probably familiar with it's line "Every time a bell rings, an angel gets his wings."


Adding some jingle bells with the tag was a must.
We want all the angels to get all there wings.


When thinking of Kevin McCallister snarling his lips and mouthing "Merry Christmas, ya filthy animal!" two things came to mind.
One, this awesome "ugly" Christmas sweater I saw years ago. (and still want BTW)
And two, all the pom pom beanies Macaulay Culkin rocks in the movie.


I thought adding some pom poms to the gift would be an appropriate way to honor both.


I know technically Mean Girls is not a Christmas movie.
But I think we can all agree that the Christmas scenes from this movie are iconic.
Obviously I had to create a tag with the famous "You go Glen Coco!" line.
In the movie candy canes are being passed out during the scene and Glen Coco happens to get four which encourages the epic line. 


Adding some candy canes with the tag was the perfect touch. 

If you'd rather spend time making the tags more detailed on the computer go for it!
You can use different colors, fonts and sizes.
 I am not technologically savvy at all.
I usually just type anything I want to print in Word.
Here are my tags if you would like to use them.
I'm sure you could do better.


I love the way these turned out.
They are so simple you can add just about anything to them or they work just fine on their own.
Each one of these quotes brought back a special memory with my loved ones.
I hope they love it just as much as I do!
I can't wait to get the rest of my gifts so I can wrap and add more tags to them.
What is your favorite Christmas movie quote?
Drop it below!


All my love,
Autumn

Wednesday, July 25, 2018

DIY Gallery Wall | Cabin Edition

Hello everyone!
Erik and I visited my family's cabin over the weekend and I was finally able to accomplish something I have dreamed of for years.
A cabin gallery wall!


You will need:
Pictures
Picture Frames
Paper
Pencil
Scissors 
Tape
Nails
Hammer
Tape Measure
Level

Select your pictures and print.
I collected several pictures taken at our cabin over the years.
Place the pictures in your desired picture frames.
I went for several different sizes and textures.
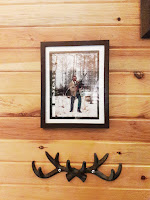
I also added in a quote, decorative antlers and a letter B to add some variety.


Using your paper and pencil, trace around the picture frames.
Cut out the outlines, these will be your guides.
Organize the outlines on your wall to your preference.
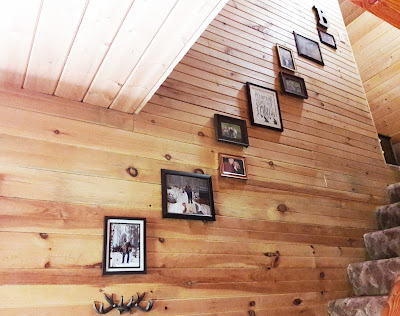
I wanted my gallery wall to flow up with the stairs.
I had to arrange them a few times until I got the look I wanted. 
This is such an easy way to save yourself a headache. 
You can rearrange the outlines on the wall until you get the look and spacing you want.


Using your tape measure, measure the distance from the top of your frame to the hanger on the back of the frames.
Use this measurement to make a mark on the outline on the wall. 
Use your hammer and hit the nail into the wall at the marked spot. 
Remove the paper outline and hang your picture.
Continue until all pictures are on the wall. 
Using your level, level each picture frame. 


I love how the beginning of this gallery wall turned out. 
I wanted to start with enough pictures for the wall to look full but to also have room for it to grow.
Our cabin was built almost thirty years ago and we have so many memories there. 
I hope the rest of my family will add their favorite pictures to the wall over time. 


Have you ever done a gallery wall?
What tips do you have to offer?

All my love,
Autumn

Sunday, April 22, 2018

DIY Keepsake Journals

Hello everyone!
You may not know I am what some people might call a pack rat.
I hold onto everything...
Receipts, concert tickets, confetti, play programs, you name it.
I have been collecting these for years.
I have always had the intention of doing something with all of these keepsakes and finally found the time.
I decided to create my own keepsake journals.


A few months ago I dug out my storage bin of all of the keepsakes I had kept and started to organize them.


I decided the best way to organize everything would be by year.
I created scratch pieces of paper, added the years 2000 -2018 on them and sorted everything into the corresponding piles.
It took a few days...


Then the real fun began!
I picked out these journals and started to add my memories to them.
To make it simpler I tried to keep everything in chronological order.
It was pretty easy adding all the keepsakes to the journals.
Most items I had saved went together.
If their was a playbill, I had the ticket to the play.
If there was a concert ticket, I had confetti I collected at the concert.
If there was an event, I had a wrist band.


On the left my plane ticket to NYC in 2007.
On the right one of the subway cards I saved and a picture of Times Square I took during our stay.


On the left my nephew's 3rd birthday invitation from 2015.
On the right a picture of Erik and my niece by the huge Christmas tree in Disneyland along with my park ticket.


On the left a picture of Andrew McMahon during his concert last year along with the confetti I collected during the show.
On the right a piece of the box they gave to me at the Lantern Festival, a picture of my friends and I at the festival with our faces painted and the event wrist band.


On the left a picture of my dad, niece and her new baby sister at the hospital.
She was so in love with her new sister that any time I got near her she would say 
"That's not your baby!" or "Go get your own baby!" 
It was so funny and something I wanted to remember so I wrote a quote under the picture.
On the right her birth announcement.

I added little touches such as stickers, Washi Tape, or things I wanted to remember.
I think they turned out so cute!

I like the minimalistic look of doodles and thought they would be the perfect fit to label the cover of these kraft journals.


My pack rat ways didn't start to fully take force until I was a teenager so I was able to fit the years 2000-2007 into one journal. 

The best part is that these journals hardly take up any room.


I have them displayed in my office on my bookshelf.
Now I can easily grab them and share my memories.
No more going to the basement, lugging up the heavy box and digging through everything to find one item.


This project was a little time consuming but I definitely think it was worth it.
They are already so much fun to look through and I know I will enjoy reliving the memories for years to come. 
How do you keep your keepsakes organized?

All my love,
Autumn

Friday, December 1, 2017

Christmas Wrapping Ideas

Hello everyone!
Happy December!
It is officially my favorite time of year.
One of my favorite things about Christmas is giving gifts.
I love the whole process: searching for the gift, buying the gift but especially wrapping the gift!
Each year I choose a color scheme for my wrapping paper.
As I mentioned in my Christmas Planner post I have really been loving the more natural colors with a bit of green.
That color scheme made it's way over to my wrapping paper as well. 


Christmas wrapping is the perfect time to repurpose random craft supplies.
This year I used twine, doilies, florals and even cinnamon sticks!


You can place almost any item on a present and it will turn out cute.
Jingle bells, clothespins, pinecones, feathers you name it!
It doesn't take much time but adds so much more to your present.


What are some of your favorite items to incorporate into your wrapping?

Monday, November 27, 2017

Makeover Monday | Erik Office Design Part 2

Hello everyone!
Happy Monday!
I hope you all had an amazing holiday weekend.
Today I will be going over the final design for Erik's office.
This is for the wall to the right of our last concept design.


This wall is painted a dark gray as well.
Against the wall Erik has two large black bookcases.
Here his massive game system collection is displayed.
Every shelf holds a different game system and to the side of the game system is a stack of games that go with it.
In between the bookcases he has his TV.
Currently the TV sits on a dinky little shelf.
I would like to get a more sturdy bookcase and get the TV mounted above it.
I really liked the look of the this bookcase and love how it is separated for storage.
On it we will store the game systems he is currently playing along with his TV series collection.
Erik has so much gaming equipment.
I think this is a great way to display it without it looking too cluttered.
How do you keep all your clutter organized?

Friday, November 17, 2017

Decorative Pie Crusts

Hello everyone!
For the past several years Erik and I have brought pie to Thanksgiving dinner.
Our second year of marriage Erik asked my mom if we could bring pie and spent hours trying out different crust recipes.
Every year since we have been in charge.
Since Erik is the pie maker I wanted to add something to the pies this year.
We had our practice run this week to make sure they were perfect for Thanksgiving and I had fun playing around with the crust design.


We decided to use leaves as a border around the pie and added a lattice design on top.
We used this cookie cutter set for the small leaves.
After they were cut out we used a kabob stick to create the design on top and placed them around the edges.


Then we used a pizza slicer and cut out large and skinny lines of dough and weaved it on top of the pie.
Make sure to use an egg wash on top so the dough doesn't burn.


Super simple.
I think it turned out so well!


We will be making a couple of pies for Thanksgiving next week and will be doing a different design on each of them.
You can find so many designs and ideas on Pinterest.
Get creative!
What are you bringing to Thanksgiving dinner?

Monday, November 13, 2017

Makeover Monday | Erik Office Design Part 1

Hello everyone!
For today's Makeover Monday I will be going over the first concept design for Erik's Office.
This is Erik's room so I have given him full creative control but I wanted to show you what he has shared with me.
This concept design covers the wall to the left as you enter the room and the wall to it's right.


As I mentioned in my previous post, Erik and I settled on a gray office with black furniture.
The walls in Erik's office have already been painted a dark gray.
Erik specifically chose this black desk because of the pull out panel.
It fits under the desk when not in use and is the perfect temporary desk for when a friend brings their computer over.
Since the desk doesn't offer a lot of storage I suggested adding two shelves slightly above the desk to create room.
This gives storage for his computer games, headphones, controllers and at my request his degree.
I will make him show that (soon to be two) off.
On his desk he has his desktop, keyboard and mouse. 
Behind the desk his black leather desk chair. 
Directly in front of the desk Erik wants to place a black leather love seat.
Both the love seat and his desk will face the TV.
The love seat will be the seating area for when they are playing his game systems on the TV.
Above the front of the desk and the love seat is the window.
We chose a gray black out shade for coverage.
The shade fits the modern feel of the room and will create a dark atmosphere even during the day. 
What do you think of the first design?
Any suggestions for his office?

Sunday, November 12, 2017

Thanksgiving Tablescape

Hello everyone!
Thanksgiving is only 11 days away!
Erik and I usually host Friendsgiving at our house so I started planning quite early.
I decided this year I wanted to dress up our table a little more.


Instead of a tablecloth I set down brown kraft paper.
I like the natural look it gives.
In the middle of the table I added leather leaf for a green base.
On top I staggered tall and short white candles and small pumpkins to complete the centerpiece.


For the table settings I started with a gold table charger topped with a white plate.
I really wanted gold silverware to match.
Since we didn't have the cash to drop on gold utensils for each person I went with plastic gold silverware and it did the trick!
To help the plates feel a little less naked and to add a pop of color I added a rolled purple napkin.


I tied it with a piece of twine and added in leather leaf to match the table.


I love how this look turned out!
The warm brown, orange and gold make it feel like fall while the green and purple add in some variety.
What are your plans for Thanksgiving?

Monday, November 6, 2017

Makeover Monday | DIY Bay Window Curtain Rod

Hello everyone!
When Erik and first started looking at houses I really wanted one with a bay window.
It wasn't a deal breaker but I wanted one pretty bad...
Luckily we found our house and it had a bay window.
What I didn't know is that bay window rods are expensive!
I'm talking around $70 dollars for the cheap ones...
After a year and a half of living in our house I decided it was time to figure out what to do.
That's when I decided to make my own.


You will need:
Pipe Cutter
Two Pipe Plugs
Spray Paint

Measure your bay window and decide how long you would like your curtain rod to be.
My local home improvement store only had a ten foot pipe which was a little over what we needed. 
Luckily my handy man husband had a pipe cutter and cut it down to the right size for me.
I am sure you could have them do this for you in store as well. 
I chose a 3/4 inch round pipe which was the smallest size available at the store.
You can go bigger if you would like just know it might be hard to find brackets that fit a larger pipe.
Mark where you want your curtain rod to bend.


Recreate the angle of your bay window.


We used two sheets of paper from a note pad and a thumb tack. 
Really fancy over here...
Place your angle guide next to the pipe and bend where you have marked the angles to go.


I stood on the pipe while Erik bent it into shape.
Once you have your curtain rod the way you would like it place the pipe plugs on either end of the curtain rod.
You can also purchase curtain rod ends from the store and add them.
I was going for a cheap curtain rod and wanted a flat end so I figured this would do.
Spray paint the pipe your desired color.
We went with black to match the rest of the living room's hardware and a satin finish so that it wasn't dull but also wan't too shiny.
While the pipe drys hang your brackets.
We did four brackets.
Two at the outer ends of the bay window and two at the corners of the larger window.
We placed them at the height we preferred. 
The brackets were for a 3/4 curtain rod but were just a little too tight on our pipe as the 3/4 measurement is for the inner part of the pipe.
We bent the brackets with a plier a few centimeters more and it worked perfectly.
Once the pipe is dry place it along the brackets and hang your curtains!


Here is the before


and after!


Altogether it cost under $30!
I will take that over $70 any day.
Now that we have the bay window curtains up the room is officially done!
Do you prefer to save money and DIY?
Or would you rather save the time and spend the money?

Monday, October 30, 2017

Makeover Monday | Office Inspiration

Hello everyone!
Happy Halloween Eve!
The only room left to cover upstairs is Erik's Office.
The overall design of his office will be up to him but I wanted to give you an idea of what he has shared with me and what we have agreed upon.
Right before we purchased our house we bought Erik a new desk. 
He always had envisioned a black desk so a black desk we got.
Since he was going with black furniture I suggested gray walls.
Gray is Erik's favorite color and at the time gray walls had just started becoming popular.
He agreed.


| via |


| via |

When we bought our house one of the upstairs rooms just happened to be painted a darker gray.
It automatically became Erik's office.
Erik is a huge gamer.
He has several different gaming systems and the games and controllers for each.
I suggested tall bookcases to help display all of his treasures.


| via |


| via |

I think the dark walls and dark furniture are perfect for his man cave.
If there is one thing I have learned it is that Erik likes it dark when playing games.
The deep color scheme will help keep the room dark and cool.
What hobbies does your signifiant other enjoy?