Showing posts with label Easter. Show all posts

Sunday, April 5, 2020

DIY Bunny Face Pots

Hello everyone!
Easter is one week away!
This will be a very different Easter for most of us.
No gathering with family, no seeing friends, no community egg hunts.
That doesn't mean we can't spread a little joy!
I had originally planned on giving out these bunny pots as Easter gifts to my family on Easter Sunday but, now that I will not be seeing them I thought it would be fun to do a good old fashioned doorbell ditch.


You will need:
Terracotta Pots
Paint, I Used Lavendar, White, Mint, and Black
Large Paintbrush
Fine Tipped Paintbrush
Crinkle Grass
Fillers


With the large paintbrush, paint the Terracotta pots your desired colors.
I went with spring pastels.
I wanted my pots to have a bit of a weathered look so, I used a large paintbrush and painted uneven coats on each of my pots.
I thought it made them feel a little more rustic.


You can use a smaller paintbrush and make them nice and even if you prefer.
Once the paint is dry, use the black paint and fine-tipped paintbrush to paint the bunny faces on the front of the pots.
Two eyes, a nose and a few whiskers in different styles.
A regular bunny face.


A winky bunny face.


And the ever-popular closed eyes bunny face.


Once the faces are dry, fill the pots with crinkle grass and a few goodies and they are ready for delivery.
Enjoy!


These cute little pots come together in no time and would be the perfect way to brighten up someone's day this holiday week. 
What are your plans for this nonconventional Easter?


All my love,
Autumn

Sunday, March 22, 2020

Easy Homemade "Bunny Tail" Donut Holes

Hello everyone!
How are we all surviving?
I feel kind of weird going on business as usual on the blog with everything going on in the world but, I also think a lot of us could use some inspiration and entertainment right now.
So, today I am going to share an easy homemade donut hole recipe with you.
I thought these would be so fun for Easter to serve as "bunny tails."


You will need:
2 Cups of Flour
1/4 A Cup of Sugar
1 and 1/2 Tablespoons of Baking Powder
1/2 A Teaspoon of Salt
1/4 A Teaspoon of Nutmeg
1 Egg
1 Cup of Milk
1 Teaspoon of Vanilla
1/4 A Cup of Melted Butter
Oil for Frying, I used Vegetable Oil


In a large bowl, whisk the flour, sugar, baking powder, salt, and nutmeg until combined.
In a medium mixing bowl, whisk the egg, milk, and vanilla until well combined.
Add the wet ingredients to the dry ingredients and mix together for a few seconds.
Add the melted butter to the mixture and stir until a thick batter forms.


Line a large baking sheet with a few layers of paper towels and top with a wire cooling rack.
Set aside.
Pour oil into a heavy-bottomed pan until the oil is about two inches deep. 
Heat the oil over medium heat until it reaches 350o.
Once the oil reaches 350o, use a cookie scoop to scoop batter and drop it into the oil.
Make sure to do this carefully and close to the oil to prevent splashback. 
Fry each donut for two minutes on each side. 
Remove the donuts from the oil to the prepared cooling rack.
Repeat until the batter is gone.
Adjust the heat level as needed to maintain the 350o oil temperature.


Brown Bunny Tails


You will need:
1 Cup of Sugar
1/2 A Tablespoon of Cinnamon


Mix the sugar and cinnamon together in a shallow bowl until well combined.
Let the donut holes cool for 1 minute on the cooling rack.
Once cool, roll the donut holes in the cinnamon-sugar mixture, one at a time, until completely covered.
Enjoy!


White Bunny Tails


You will need:
1 Cup of Powdered Sugar


Place the powdered sugar in a shallow bowl.
Let the donut holes cool for 1 minute on the cooling rack. 
Once cool, roll the donut holes in the powdered sugar, one at a time, until completely covered.
Enjoy!


How easy is that?!
I love that you don't have to worry about yeast or rolling the dough out with this recipe.
It would be the perfect quick and festive Easter morning breakfast.
If you decide to not go the Easter route, it's still a perfect quick and easy breakfast. 😉
What bunny tail would you prefer?
Brown or white?


All my love,
Autumn

Monday, April 22, 2019

A Rainy Easter Weekend

Hello everyone!
I hope you all had a pleasant weekend.
Erik and I had a lot of fun enjoying some Easter traditions.
On Friday night we had a date night coloring Easter eggs.
Every year we color Easter eggs to leave for the Easter Bunny to hide.
The night before Easter we leave them out along with some carrots for the Easter Bunny.
This year we left some roasted carrots out in the hopes we could persuade the Easter Bunny to leave us really good items in our baskets.


I think it worked!
The Easter Bunny found us and brought us many goodies.
He must have gotten the memo that we are on a Harry Potter kick because he brought both of us something Harry Potter themed.
 Erik got the Unofficial Harry Potter Cookbook and I got Harry Potter and the Cursed Child.
I am so excited to put both of them to use!
Erik and I love to bake together and baking a Harry Potter themed treat is right up our alley.
I also have not read Harry Potter and the Cursed Child yet.
Erik and I are almost done with the last Harry Potter book so it's perfect timing!


After we found all of our eggs and looked through our baskets we made breakfast.
We have made "bunny bum" pancakes every Easter morning since we have been married.
They are super easy to whip up.
Make one large round pancake and two small.
Place the small pancakes at the bottom of the large pancake and decorate with a sliced strawberry for the pad of the foot and three chocolate chips for the pads of the toes.
Add a dollop of whip cream to the middle of the large pancake and you've got yourself a bunny bum!


After breakfast we relaxed, digested and enjoyed what the Easter Bunny brought us. 
Then it was off to my parents house for dinner and an egg hunt.
We have had a lot of rain recently and my mom tried to plan the egg hunt around a break in the weather.
Unfortunately it started to pour the minute we started.
My family crammed under the patio umbrella hoping the rain would pass.
The kids would not let the weather stop them and found all of their eggs.


After the hunt, we enjoyed dinner with the family and then came back home to relax before the start of the work week.
All in all, not a bad Easter.
Even with a little rain.
How did you spend your Easter?


All my love,
Autumn

Saturday, April 20, 2019

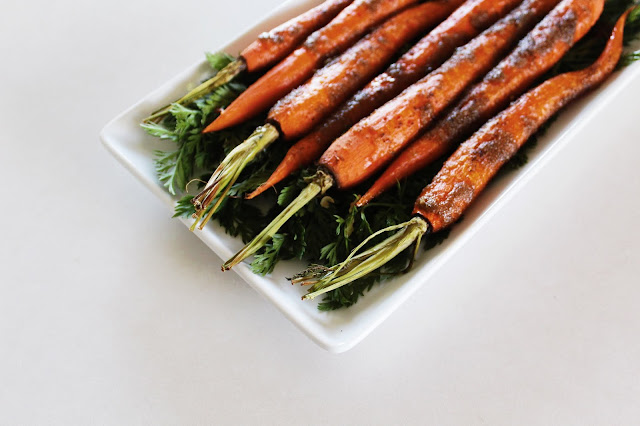
Roasted Carrots Three Ways

Hello everyone!
Happy Easter weekend!
The big day is almost upon us and if you are looking for an effortless side dish to whip up for you or your guests, I have one that is Easter Bunny approved.
Roasted carrots!


Since we all have different tastes I am sharing three different ways to roast them.
I used carrots with a stem because I wanted the look of a fresh carrot right out of the garden.


Feel free to use these recipes with any carrots you desire.

8 - 10 Carrots With Stems
2 Tablespoons of Butter, Melted
2 Teaspoons of Minced Garlic
4 Tablespoons of Shredded Parmesan Cheese
Salt To Taste
Pepper To Taste


Preheat oven to 400o.
Trim the stems of the carrots to 2 inches long.
Wash and peel carrots.
Line a baking sheet with aluminum foil and grease.
Place the carrots on the baking sheet.
In a small bowl, mix melted butter and garlic together.
Drizzle the mixture over the carrots and roll in any run off. 
Cook in the oven for 20 minutes.
Top carrots with parmesan cheese and roast for another 15 minutes or until fork tender.
Remove from oven.
Salt and pepper to taste.
Enjoy warm!

8 - 10 Carrots with Stems
3 Tablespoons of Butter, Melted
1 Teaspoon of Thyme
1 Teaspoon of Minced Garlic
2 Tablespoons of Brown Sugar
Salt To Taste
Pepper To Taste


Preheat oven to 400o.
Trim the stems of the carrots to 2 inches long.
Wash and peel carrots.
Line a baking sheet with aluminum foil and grease.
Place carrots on the baking sheet. 
In a small bowl, mix the melted butter, thyme, garlic, and brown sugar together.
Pour the mixture over the carrots and roll in any run off.
Cook for 30 - 35 minutes, or until fork tender.
Remove from oven.
Salt and pepper to taste. 
Enjoy warm!


8 - 10 Carrots With Stems
1 and 1/2 Teaspoons of Minced Garlic
1 Tablespoon of Fresh Rosemary, Finely Chopped
2 Teaspoons of Butter, Melted
Salt To Taste
Pepper To Taste


Preheat oven to 400o.
Trim the stems of the carrots to 2 inches long.
Wash and peel carrots.
Line a baking sheet with aluminum foil and grease.
Place carrots on the baking sheet.
In a small bowl, mix together the butter, garlic and rosemary. 
Pour the mixture over the carrots and roll in any run off.
Cook for 30 - 35 minutes, or until fork tender.
Remove from oven.
Salt and pepper to taste. 
Enjoy warm!


All of these recipes are quick and easy to whip up and make for the perfect side to an Easter dinner.
After trimming down the stems I didn't want to waste the leaves so I decided to serve my carrots on top of them.
I gave them a quick rinse and let them dry while the carrots cooked.
Then I added them to my serving dishes and placed the carrots on top.
I thought it added some fun color and made me feel better that the leaves didn't just go to waste.
What do you have for Easter dinner?


All my love,
Autumn


Friday, April 12, 2019

DIY Easter Egg Garland

Hello everyone!
While pulling out our Easter decorations, I discovered that Erik and I had quite the stash of plastic Easter eggs.


I usually add a few to glass jars for decoration but had no idea what to do with the rest...
After looking online for some inspiration I decided to turn them into a garland.


You will need:
Plastic Easter Eggs, Make Sure They Have Holes At Both Ends
String, I Used Bakers Twine
A Needle
Scissors


Sort the eggs into colors and size.
Lay them out in the pattern you desire and measure the string against them, I added a few extra inches for safety.
Cut the string.
Tie a generous knot at one end and thread the other end through a needle.


I originally was going to thread the string through the holes by itself but found that the majority of the holes on my eggs were not completely punctured.
The needle helped break through them easily.
Open an egg and thread the needle through one of the bottom holes.
Thread the needle through the same top hole and close the egg.


Repeat until you have all of your eggs threaded.
Remove the needle from the thread and tie it off.
Cut off excess string.
Place where you desire.
Enjoy!


I can't wait until the day Erik and I have a mantle but for now I make our entry way table work for our garlands.
It's the first thing you see when you walk into our house and I love how it showcases our holiday decorations. 


All together the garland took me less than half an hour to make and now I don't have a bag full of plastic eggs just taking up space in my basement.
Win, win.
Does the Easter Bunny hide plastic or real eggs at your house?


All my love,
Autumn

Sunday, April 8, 2018

Confetti Easter Egg Fight! | Easter 2018

Sunday April 1st


We celebrated Easter at my parents house.
We had an egg hunt, opened Hatchimals and had a confetti egg fight.
My sister also shared an exciting announcement.
How did you celebrate Easter?

Saturday, March 31, 2018

Speckled Easter Cake

Hello everyone!
Happy Easter weekend!
For the past few years I have been seeing these adorable speckled cakes all over.
I decided to make it our Easter dessert for the year.


You will need:
A Cake
Buttercream Frosting
Food Coloring
Water 
Food Paintbrush
Mini Cadbury Eggs, Optional 

Start with the cake of your choice.
Nothing says spring to me more than a white cake and some fresh fruit.
I made two eight inch round white cakes and placed whip cream and fresh strawberries in between.
Feel free to use whatever flavor and size of cake you prefer.


Once I had my cake stacked I dyed my buttercream frosting a light blue to match the blue Mini Cadbury Eggs.
Any of the egg colors will work.
Apply a thin layer of the buttercream frosting over the entire cake.
Place the cake in the fridge for a half hour to let the crumb coat stiffen.
Once the frosting has stiffened apply another thin coat of the buttercream frosting and place it back into the fridge for an additional half hour to allow the second layer of frosting to stiffen as well.
While the second layer is stiffening prepare your food coloring.
I added blue food coloring to a bowl and mixed it with a little bit of water to dilute it.
I used ten drops of food coloring and three drops of water. 
You don't want to dilute the food coloring too much or the drops will run on the cake instead of staying in place.
I practiced splattering the food coloring on some extra frosting to get a feel for it and to see if the food coloring was to the consistency I wanted. 
Cover your workspace in newspaper, paper towels, whatever you have laying around to protect it from getting splattered.
Once the second layer of frosting has stiffened remove from fridge and place on your covered work space.
I added a piece of parchment paper under my cake so I could move it around without moving my newspaper and exposing my workspace.


Using the paintbrush and your index finger, pull the paintbrush backwards with your finger and release it letting the paintbrush splatter the cake with the food coloring.
Repeat until the cake has the coverage you want.
To add some extra decoration to the cake I sorted the blue Mini Cadbury Eggs and added them around the edge on top of the cake. 
I then splattered the Cadbury Eggs with my food coloring mixture so they would match.
Adding the eggs is optional.
The cake looks so cute on its own!


I absolutely love how the cake turned out!
It is the perfect spring dessert.
It's also the perfect way to use up any extra Cadbury Eggs you might have after Easter.
Yeah right...
What desserts to you enjoy on Easter?

All my love,
Autumn